Wednesday, March 6, 2013

Venture into Crochet

I have known how to crochet for years, but I was lousy at it.  My rows were crooked, I didn't recognize my stitches, and patterns confused me.  Every once in awhile, I would get interested in trying to improve my crocheting skills, but I would get frustrated quickly and put all of my yarn and hooks away.  My mom gave me a pattern for a baby layette, probably 13 years ago, and it was the first pattern I ever successfully completed.  It wasn't a roaring success, but I did finish the pattern, and it was recognizable as a dress, bonnet, and booties.  My confidence was boosted, but I was so busy taking care of my babies (and having more babies) that I did not continue to crochet.

In the Fall of 2012, I went to a fundraiser at a friend's house.  I noticed a bundle of cute crochet items on the table for the silent auction and no one had bid on them.  I talked to the sweet lady who had crocheted (and knit) the darling little purses, slippers, headband, and scarf to donate to the fundraiser and then I made sure that I bid on those items.  There was something about going home with my auction-win that inspired me to get out my yarn and crochet hooks.

I found a simple scarf pattern online and made this:


After receiving a few compliments, I made more scarves.  And a few hats.  And then I decided to make a toy.


The penguin was the beginning of the end for me.  I could not stop crocheting.  I made headbands, a purse, a seal, a bunny, a sweater, and on and on and on.  Because I was crocheting so much, my skills improved a great deal.  Patterns became easier for me to read, my stitches were not a mess, and I was even able to create a few original designs.

Examples:


Oh and my favorite of all:


I am having so much fun and spending so very much money at the yarn store!  

Currently, I am working on projects for my nephews...


I have a few projects to finish and then I will focus on the Fair.  What should I enter?  


Saturday, September 29, 2012

Oreo Cookies!

I love finding good copy-cat recipes.  It's so fun to recreate a popular recipe using good quality ingredients and no preservatives.  More often than not, the homemade version is so much better!  I came across this homemade Oreo cookie recipe and decided to try it.

First, I made the cookie.  The dough seems thick and crumbly in the mixer, in the beginning.  I just kept mixing until it all came together.  I used a tablespoon to scoop the dough, then rolled it into a small ball, and flattened it a little on the cookie sheet with the bottom of a slightly wet, metal measuring cup.  They baked for about 10 minutes and looked like this:


If you want your cookie to end up closer to the size of a real Oreo, try using a teaspoon to measure the dough instead of a tablespoon.  I didn't even fill the tablespoon completely and I ended up with cookies that are approximately 3 1/2 inches in diameter.

The frosting was a simple mixure of sifted, powdered sugar, butter, and vanilla.  The recipe I was working from called for a mix of butter and shortening, but I used all butter.  I think shortening is gross.  Once the cookies were completely cooled and the frosting was mixed, I began assembling.  First, I matched up all the cookies by size so I would have a more uniform Oreo in the end.  Then, I used a flat knife to put a dollap of frosting in the middle of one cookie (on the flat side) and pressed another cookie on top (flat sides facing each other), until the frosting reached the edges.


These are good!  They taste better than Oreos, in my opinion.  I was surprised at how quickly I was able to make these.  The recipe seems like it would be labor intensive, but really it is simple and easy.

Homemade Oreos


Ingredients:

For the cookies:

1¼ cups all-purpose flour

½ cup unsweetened Dutch process cocoa powder
1 tsp. baking soda
¼ tsp. baking powder
¼ tsp. salt
¼ sugar
10 tbsp. (1¼ sticks)  butter, at room temperature
1 large egg

For the Filling

8 T. butter, at room temperature
2 cups powdered sugar, sifted
2 t. vanilla

Preheat oven to 375 F degrees.
Combine dry ingredients for the cookies into mixer bowl.  Mix on low for a few seconds to combine.  Add room temperature butter and egg and mix until dough comes together.  Spray baking sheets with non-stick cooking spray and then using a tablespoon, scoop your dough, roll it into a ball and place on baking sheet.  (For smaller cookies, use a teaspoon).  Using the flat end of a measuring cup, slightly flatten cookies before baking.  (If the measuring cup is sticking, moisten the bottom a little with water).  
Bake for 9-11 minutes.  Let cookies cool completely before assembling.
For the filling, sift 2 cups of powdered sugar into a mixer bowl.  Add butter and vanilla.  Mix on medium speed until light and fluffy.  Place a dollap of frosting on the flat side of one cookie and then press gently with another cookie (flat sides facing each other) until filling reaches the edges.

*Recipe slightly adaped from Annie's Eats.  


Monday, September 24, 2012

Homemade Salsa

I canned my first batch of salsa today.  I normally leave the salsa-making to my husband because he does an amazing job.  He also does homemade tortilla chips and the combination is better than anything I've had out or from the store.  I would love to can some of his salsa to add to our gift baskets for Christmas, but there are two problems with that.  The first problem is that his salsa is HOT.  We all love it here at our house, but I need it toned down for the general public.  Also, there is the issue of pH balance.  When using a water bath to process jars for canning, the food inside must be a certain pH in order to preserve it safely.  Tomatoes are one of those borderline foods that need a little vinegar to get them to the correct pH level.  I have no idea how to adjust our salsa to meet the requirements for canning.  If I had a pressure canner, then I suppose this wouldn't be an issue at all.  

I found a packet of Salsa Mix spices with the canning supplies today, made by Ball.  


My goal was to make a restaurant style salsa that would appeal to the average person.  The recipe was super easy; I just had to combine tomatoes (I used canned), the spice packet, and 3 Tablespoons of vinegar.  My immersion blender made it easy to puree the entire mixture.  I wanted the final product to be relatively smooth, not chunky.  I brought it to a boil, then simmered for 5 minutes.  A quick taste, and I realized it was barely spicy.  I added a little Tapatio to bring it up a notch, then ladled it into my Ball jars and processed.  

The result?  Not exactly what I wanted.  It tastes very much like Chili's salsa.  I mean, that is a restaurant salsa, but definitely not my favorite.  It's still good though and I think it will make a nice gift, assuming the person enjoys the salsa at Chili's.  


Sunday, September 9, 2012

Week 5 Lunches

I didn't think I was going to get the lunches done this week.  I was busy today, not feeling too well, and it is so dang hot that I definitely didn't want to go to the grocery store!  I finally just bit the bullet and went shopping.  It was crowded and horrible at the store.  I feel like I accomplished something by getting the lunches put together at all today.  The Lunchables were looking mighty tempting this week, haha!

This week, the lunches contain:


  • Cheese Tortellini w/Marinara dipping sauce
  • Lil' Smokies
  • Frozen Juice Boxes
  • Frozen Go-Gurts
  • Sugar and Spice Pita Chips
  • Raisins
  • Watermelon
This definitely wasn't my best lunch planning, but it's done and the girls seem happy with what I got for them.


Monday, September 3, 2012

Week 4 Lunches

Labor Day Weekend means that the kids got an extra day off of school and I only had to pack them each 4 lunches instead of 5.  Plus, I had an extra day to shop for groceries.  I also had an extra day to pack the lunches.  So why does it seem like I had less time than ever?  Surely it could be because I procrastinated everything until the last minute...

The lunches this week:

  • Wheat Thins and Peanut Butter Dip
  • Sliced Oranges
  • Turkey Wraps
  • Snack Mix
  • Frozen Apple Sauce
  • Frozen Juice Boxes

The apple sauce and juice boxes will most likely be a staple in the kids' lunches until the weather cools down.  It is still so hot here.  I am definitely looking forward to Autumn Weather.


Sunday, September 2, 2012

White Rolls

White Rolls
I have been making these White Rolls for quite a few years now.  The recipe comes right out of my KitchenAid recipe book and is called Basic White Bread.  I always make it into rolls.  Large rolls for hamburgers or sloppy joes.  Small rolls to go with soup.  Long, skinny rolls for hot dog buns.

Basic White Bread
Courtesy of KitchenAid

1/2 c. low fat milk
3 T. Butter
3 T. sugar
2 t. salt

Combine in small saucepan.  Stir over low heat until butter melts and sugar dissolves.

1/2 c. warm water
2 packets dry active yeast

Combine in mixing bowl for 5 minutes.

5-6 cups of all purpose flour

Add 4 1/2 cups flour to water/yeast mixture, then add
milk mixure.  Using dough hook on slow speed,  combine all ingredients.  Add flour in 1/4 c. increments until dough is slightly sticky and forms a ball.  Knead for 5 minutes in mixer.  Turn dough out into an oiled bowl, turning over so that the top is greased.  Cover and let rise for an hour or until doubled in bulk.
Form dough into rolls, cover, and let rise for 30 min to 1 hour, until doubled.  Bake at 400 F degrees for 10-15 minutes or until rolls are nicely browned and cooked through.  Use a cold stick of butter to rub on top of the hot rolls to coat them.

This was one of my entries into the LA County Fair.  They are pretty basic and I'm not expecting a prize for them.  I made these again last night to go with dinner and then left the house for a few hours.  While I was gone, my son at 3 of these rolls.  Then he had another one with dinner.  Later that night, he ate the last roll.  Five rolls!  That was like winning a first place ribbon to me.

Wednesday, August 29, 2012

Fair Entries Part 2

I wanted to make a candy to enter into the Fair.  I don't usually make candy, but I had made Divinity once before and it tasted good, so I figured I'd give it a shot.  The recipe is simple.  Basically I had to boil sugar, corn syrup, and water to 260 F degrees and then whip up a couple of egg whites, add the hot syrup, whip it all up, add a bit of vanilla and scoop the candy out onto waxed paper.  Like I said, I'd done it once before and it tasted yummy.
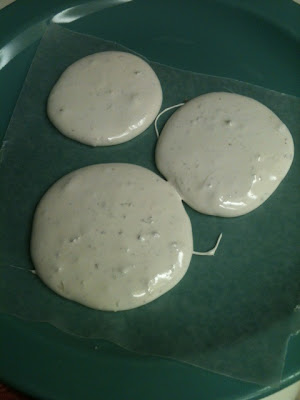
I followed the directions (or so I thought) and ended up with a couple dozen pieces of Divinity (...or so I thought...).  I licked the spoon and the bowl... it was so good!  I didn't even realize there was a problem until I tried to get the candy off of the wax paper and it wouldn't come off.  How can I package it up for the Fair if I can't even get it off of the paper?  I began to suspect that I had done something wrong.
I turned to Google to solve my problem.  I typed "divinity" into the search box and hit "images".  Here is an example of what I found:

Google Image of Divinity


Wow, that Divinity is beautiful!  I stared in shock, because what I had made looked nothing like that!  How could I make a candy that tasted so good, but was completely wrong?  Why would I even try to make a candy that I obviously had no clue about?  I don't know.  
I had one hour until I needed to leave to submit my Fair Entries and this is what my candy looked like:


My Divinity
Ouch.  I had a few options at this point.

  1. Throw the candy away and scratch the event 
  2. Submit the failed batch and hope that the judges didn't know what Divinity should like like either.
  3. Start over and try to do it right.
Since it is relatively quick to make, I decided to start over.  I beat the crap out of that boiled sugar and egg white mixture.  I had no idea what it was supposed to do, but I beat it until I saw it do something.  At some point, it changed.  It just went from glossy, sticky, marshmallow-ness, to a stiffer, unsticky, thicker consistancy.  I scooped it out and stuck a candied cherry in the middle of each one.  They tasted delicious, although I think I over beat the candy.  I had no time or desire to start again, so this batch was getting submitted.

Fair Entry Divinity

My kids ate up every single piece that was left over.  They certainly did not turn out beautiful like the Google picture, but at least it was DIVINITY.  Today I thought that doing another batch of candy with my oldest daughter would be fun.  It is so easy and she loves to cook and bake, I figured she'd get a kick out of it.  
Practice makes perfect and this newest batch was the prettiest.  I still think I beat the mixture too long, but not by much.  I know exactly how to do it next time.  All of my munchkins over here are gobbling it up!  

Not Quite Google Worthy Divinity