Saturday, September 29, 2012

Oreo Cookies!

I love finding good copy-cat recipes.  It's so fun to recreate a popular recipe using good quality ingredients and no preservatives.  More often than not, the homemade version is so much better!  I came across this homemade Oreo cookie recipe and decided to try it.

First, I made the cookie.  The dough seems thick and crumbly in the mixer, in the beginning.  I just kept mixing until it all came together.  I used a tablespoon to scoop the dough, then rolled it into a small ball, and flattened it a little on the cookie sheet with the bottom of a slightly wet, metal measuring cup.  They baked for about 10 minutes and looked like this:


If you want your cookie to end up closer to the size of a real Oreo, try using a teaspoon to measure the dough instead of a tablespoon.  I didn't even fill the tablespoon completely and I ended up with cookies that are approximately 3 1/2 inches in diameter.

The frosting was a simple mixure of sifted, powdered sugar, butter, and vanilla.  The recipe I was working from called for a mix of butter and shortening, but I used all butter.  I think shortening is gross.  Once the cookies were completely cooled and the frosting was mixed, I began assembling.  First, I matched up all the cookies by size so I would have a more uniform Oreo in the end.  Then, I used a flat knife to put a dollap of frosting in the middle of one cookie (on the flat side) and pressed another cookie on top (flat sides facing each other), until the frosting reached the edges.


These are good!  They taste better than Oreos, in my opinion.  I was surprised at how quickly I was able to make these.  The recipe seems like it would be labor intensive, but really it is simple and easy.

Homemade Oreos


Ingredients:

For the cookies:

1¼ cups all-purpose flour

½ cup unsweetened Dutch process cocoa powder
1 tsp. baking soda
¼ tsp. baking powder
¼ tsp. salt
¼ sugar
10 tbsp. (1¼ sticks)  butter, at room temperature
1 large egg

For the Filling

8 T. butter, at room temperature
2 cups powdered sugar, sifted
2 t. vanilla

Preheat oven to 375 F degrees.
Combine dry ingredients for the cookies into mixer bowl.  Mix on low for a few seconds to combine.  Add room temperature butter and egg and mix until dough comes together.  Spray baking sheets with non-stick cooking spray and then using a tablespoon, scoop your dough, roll it into a ball and place on baking sheet.  (For smaller cookies, use a teaspoon).  Using the flat end of a measuring cup, slightly flatten cookies before baking.  (If the measuring cup is sticking, moisten the bottom a little with water).  
Bake for 9-11 minutes.  Let cookies cool completely before assembling.
For the filling, sift 2 cups of powdered sugar into a mixer bowl.  Add butter and vanilla.  Mix on medium speed until light and fluffy.  Place a dollap of frosting on the flat side of one cookie and then press gently with another cookie (flat sides facing each other) until filling reaches the edges.

*Recipe slightly adaped from Annie's Eats.  


Monday, September 24, 2012

Homemade Salsa

I canned my first batch of salsa today.  I normally leave the salsa-making to my husband because he does an amazing job.  He also does homemade tortilla chips and the combination is better than anything I've had out or from the store.  I would love to can some of his salsa to add to our gift baskets for Christmas, but there are two problems with that.  The first problem is that his salsa is HOT.  We all love it here at our house, but I need it toned down for the general public.  Also, there is the issue of pH balance.  When using a water bath to process jars for canning, the food inside must be a certain pH in order to preserve it safely.  Tomatoes are one of those borderline foods that need a little vinegar to get them to the correct pH level.  I have no idea how to adjust our salsa to meet the requirements for canning.  If I had a pressure canner, then I suppose this wouldn't be an issue at all.  

I found a packet of Salsa Mix spices with the canning supplies today, made by Ball.  


My goal was to make a restaurant style salsa that would appeal to the average person.  The recipe was super easy; I just had to combine tomatoes (I used canned), the spice packet, and 3 Tablespoons of vinegar.  My immersion blender made it easy to puree the entire mixture.  I wanted the final product to be relatively smooth, not chunky.  I brought it to a boil, then simmered for 5 minutes.  A quick taste, and I realized it was barely spicy.  I added a little Tapatio to bring it up a notch, then ladled it into my Ball jars and processed.  

The result?  Not exactly what I wanted.  It tastes very much like Chili's salsa.  I mean, that is a restaurant salsa, but definitely not my favorite.  It's still good though and I think it will make a nice gift, assuming the person enjoys the salsa at Chili's.  


Sunday, September 9, 2012

Week 5 Lunches

I didn't think I was going to get the lunches done this week.  I was busy today, not feeling too well, and it is so dang hot that I definitely didn't want to go to the grocery store!  I finally just bit the bullet and went shopping.  It was crowded and horrible at the store.  I feel like I accomplished something by getting the lunches put together at all today.  The Lunchables were looking mighty tempting this week, haha!

This week, the lunches contain:


  • Cheese Tortellini w/Marinara dipping sauce
  • Lil' Smokies
  • Frozen Juice Boxes
  • Frozen Go-Gurts
  • Sugar and Spice Pita Chips
  • Raisins
  • Watermelon
This definitely wasn't my best lunch planning, but it's done and the girls seem happy with what I got for them.


Monday, September 3, 2012

Week 4 Lunches

Labor Day Weekend means that the kids got an extra day off of school and I only had to pack them each 4 lunches instead of 5.  Plus, I had an extra day to shop for groceries.  I also had an extra day to pack the lunches.  So why does it seem like I had less time than ever?  Surely it could be because I procrastinated everything until the last minute...

The lunches this week:

  • Wheat Thins and Peanut Butter Dip
  • Sliced Oranges
  • Turkey Wraps
  • Snack Mix
  • Frozen Apple Sauce
  • Frozen Juice Boxes

The apple sauce and juice boxes will most likely be a staple in the kids' lunches until the weather cools down.  It is still so hot here.  I am definitely looking forward to Autumn Weather.


Sunday, September 2, 2012

White Rolls

White Rolls
I have been making these White Rolls for quite a few years now.  The recipe comes right out of my KitchenAid recipe book and is called Basic White Bread.  I always make it into rolls.  Large rolls for hamburgers or sloppy joes.  Small rolls to go with soup.  Long, skinny rolls for hot dog buns.

Basic White Bread
Courtesy of KitchenAid

1/2 c. low fat milk
3 T. Butter
3 T. sugar
2 t. salt

Combine in small saucepan.  Stir over low heat until butter melts and sugar dissolves.

1/2 c. warm water
2 packets dry active yeast

Combine in mixing bowl for 5 minutes.

5-6 cups of all purpose flour

Add 4 1/2 cups flour to water/yeast mixture, then add
milk mixure.  Using dough hook on slow speed,  combine all ingredients.  Add flour in 1/4 c. increments until dough is slightly sticky and forms a ball.  Knead for 5 minutes in mixer.  Turn dough out into an oiled bowl, turning over so that the top is greased.  Cover and let rise for an hour or until doubled in bulk.
Form dough into rolls, cover, and let rise for 30 min to 1 hour, until doubled.  Bake at 400 F degrees for 10-15 minutes or until rolls are nicely browned and cooked through.  Use a cold stick of butter to rub on top of the hot rolls to coat them.

This was one of my entries into the LA County Fair.  They are pretty basic and I'm not expecting a prize for them.  I made these again last night to go with dinner and then left the house for a few hours.  While I was gone, my son at 3 of these rolls.  Then he had another one with dinner.  Later that night, he ate the last roll.  Five rolls!  That was like winning a first place ribbon to me.

Wednesday, August 29, 2012

Fair Entries Part 2

I wanted to make a candy to enter into the Fair.  I don't usually make candy, but I had made Divinity once before and it tasted good, so I figured I'd give it a shot.  The recipe is simple.  Basically I had to boil sugar, corn syrup, and water to 260 F degrees and then whip up a couple of egg whites, add the hot syrup, whip it all up, add a bit of vanilla and scoop the candy out onto waxed paper.  Like I said, I'd done it once before and it tasted yummy.
I followed the directions (or so I thought) and ended up with a couple dozen pieces of Divinity (...or so I thought...).  I licked the spoon and the bowl... it was so good!  I didn't even realize there was a problem until I tried to get the candy off of the wax paper and it wouldn't come off.  How can I package it up for the Fair if I can't even get it off of the paper?  I began to suspect that I had done something wrong.
I turned to Google to solve my problem.  I typed "divinity" into the search box and hit "images".  Here is an example of what I found:

Google Image of Divinity


Wow, that Divinity is beautiful!  I stared in shock, because what I had made looked nothing like that!  How could I make a candy that tasted so good, but was completely wrong?  Why would I even try to make a candy that I obviously had no clue about?  I don't know.  
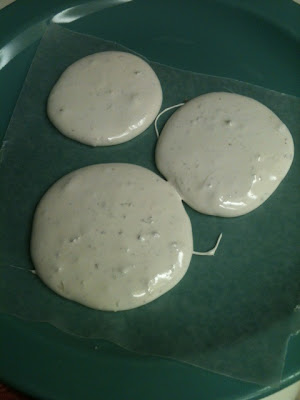
I had one hour until I needed to leave to submit my Fair Entries and this is what my candy looked like:


My Divinity
Ouch.  I had a few options at this point.

  1. Throw the candy away and scratch the event 
  2. Submit the failed batch and hope that the judges didn't know what Divinity should like like either.
  3. Start over and try to do it right.
Since it is relatively quick to make, I decided to start over.  I beat the crap out of that boiled sugar and egg white mixture.  I had no idea what it was supposed to do, but I beat it until I saw it do something.  At some point, it changed.  It just went from glossy, sticky, marshmallow-ness, to a stiffer, unsticky, thicker consistancy.  I scooped it out and stuck a candied cherry in the middle of each one.  They tasted delicious, although I think I over beat the candy.  I had no time or desire to start again, so this batch was getting submitted.

Fair Entry Divinity

My kids ate up every single piece that was left over.  They certainly did not turn out beautiful like the Google picture, but at least it was DIVINITY.  Today I thought that doing another batch of candy with my oldest daughter would be fun.  It is so easy and she loves to cook and bake, I figured she'd get a kick out of it.  
Practice makes perfect and this newest batch was the prettiest.  I still think I beat the mixture too long, but not by much.  I know exactly how to do it next time.  All of my munchkins over here are gobbling it up!  

Not Quite Google Worthy Divinity


Fair Entries Part 1

The L.A. County Fair is opening this weekend and I submitted a few items into the food competitions.  One of my favorite entries was a loaf of Oatmeal Buttermilk Wheat Bread.  This recipe comes from Annie's Eats.  I love Annie's recipes!  The bread is soft, has great flavor, and makes a great sandwich bread.

Annie's Eats Oatmeal Buttermilk Wheat Bread


I made two loaves of bread from this single recipe instead of just one this time.  If you make only one loaf, it will be enormous!
One of the ingredients for this bread is buttermilk.  I never keep fresh buttermilk on hand, so I made my own by adding a tablespoon of vinegar per cup of milk and let is sit on the counter for 5 minutes.  The substitution worked perfectly.

Oatmeal Buttermilk Wheat Bread

I usually make rolls with my bread instead of loaves, but since this was a Fair entry I went ahead and made 2 loaves.  One loaf went to the Fair and one stayed at home with us.  We made turkey and cheese sandwiches with this lovely bread and they were so delicious!  Even the crust was soft, unlike most of our bread bought at the store.
Probably the only drawback to homemade bread is that it doesn't stay fresh for very long.  I suppose I could refrigerate it or even freeze it, but I prefer to just make enough to last for a day or two and then make bread again when we want it.  

Turkey and Cheese Sandwich on Homemade Bread
Check back tomorrow for more of my Fair entries and see what happens when I try to make candy without having any idea of what it is actually supposed to look like.


Sunday, August 26, 2012

Week 3 of Lunches

This week the girls requested sandwiches in their lunches.  We now have a whole collection of sandwich cutters (thank you, Nancy!) and they are anxious to have turkey sandwiches that look like dolphins, dinosaurs, and penguins.  I really do not want to make a weeks worth of sandwiches that might become soggy in the refrigerator, so I will go ahead and make them a new sandwich the night before and save myself a little time in the morning.  This week:


  • Turkey and Cheese sandwiches
  • Honey Mustard Pretzals
  • Black Olives
  • Crinkle Cut Cucumbers and Carrots 
  • Ranch Dip
  • Applesauce (no sugar added) (frozen)
  • Juice Boxes (frozen)
I wrapped plastic wrap around the cucumber slices before putting them in the baggy with the carrots.  I am hoping they don't turn soggy.  The applesauce should mostly defrost and hopefully be a nice, cold treat for the girls.  I included a baggy with a plastic spoon and napkin.
I also found little plastic containers for the Ranch Dip for $1 (4 in each package).  I made the dip myself (42 cents for the seasoning, $2 for sour cream).  It filled 8 containers and there is more left over to finish the week.  At the market, a pack of 4 Hidden Valley Ranch Dip containers cost over $4!  


I love the way the sandwich cutters are square shaped and only take the crust off of the sandwich.  
For the record, Daniel will only eat sandwiches cut into train shapes.  The girls, however, will be excited to see what shape they get each day in their lunch.  Once again I will be using frozen juice boxes and a frozen water bottle to keep the lunches cool during this warm weather.  


Friday, August 24, 2012

Canning for Therapy

What could be more Little House on the Prairie than canning?  I suppose slaughtering and butchering a pig would be, but too bad for me, I missed out on buying a Fair Pig this year.  Ah well, maybe next year.
Anyways, I received a gift of Elderberries yesterday.  I have never tasted, seen, or even heard of an Elderberry before.  The berries are small, and grow in clusters.  These were still attached to their stems and looked like pretty little bunches of tiny grapes.  They were dark purple with a frosted white over them.  I pulled out the recipe my friend had included with the berries and carefully looked it over, because not only was I unfamiliar with how to work with Elderberries, this was also the first time I would be making a jelly instead of a jam.  (Did I mention that my very bestest friends send me gifts of homegrown food?)
As I stood over the sink roughly stripping the fruit from the stems and rinsing them in a colandar, I could feel the stress of my day slipping away.  I don't know that yesterday was any different than any other day, but for some reason my stress levels had grown to epic proportions.
Stemmed Elderberries

I boiled the berries with a little water and then strained them through a cheese cloth and mesh colandar overnight.  This morning, I had a beautiful bowl of plum-colored Elderberry juice waiting to be made into jelly.  The process was just like making jam at this point.  I added lemon juice and pectin to the juice, boiled it, added sugar and brought it to a boil again.
Suddenly, I had a pan full of the prettiest jelly I have ever seen.  It was so dark it looked black, but when I stirred it, the color was a beautiful dark reddish purple.


I finished the process by ladling the hot jelly into hot jars, attaching the 2-piece lids, and then boiling them to seal them.*  When I look at my new jars of jelly sitting on the counter I feel happy and proud of them.  I'm sure that canning is much cheaper than spilling my troubles to a therapist and I feel so good and accomplished when I see the final product.

Elderberry jelly
Dark Purple Cupcake Wrapper to Decorate


*My jars actually did NOT seal the first time I processed them.  I don't think I was getting my lids hot enough or keeping them hot enough, so I reheated just the lids, and attached them one at a time while the others stayed in the hot water.  I reprocessed in a water bath and set them back onto a towel, on the counter.  Seconds later I heard the POP POP POP, that gives every canner a thrill no matter how many times they have heard it.


Monday, August 20, 2012

Choo Choo= Chew Chew

Daniel is a picky eater.  He just isn't very interested in food in general.  He would rather play than eat.  Just for fun the other day, I cut the kids' sandwiches with a gingerbread man cookie cutter.  Daniel thought it was so funny to bite the arms and legs off of it and it surprised me that he ate so much.  My cousin told me about the sandwich cutters that she has at her house and I had to have them!  I found the train sandwich cutter at my local Winco and made a sandwich for Daniel.


Amazing results.  Daniel ate every bite of that sandwich.  I can't wait to try some of the other shapes.  We went through an entire loaf of bread yesterday because every kid had to have their own train.  This has to be one of the best inventions ever!

Sunday, August 19, 2012

Week 2 of Lunches


Here is week 2 of my girls' school lunches.  I must say, it is a lot of work to prep these lunches for an entire week, but last week, as I put those lunches together in the morning, it was so quick and easy! Totally worth it.  Even if I am running late, I don't have to think about what to pack or how much time it is going to take to make sandwiches, etc.
So, this week they are getting:


  • Mini-Meatballs w/BBQ dipping sauce (I will pack them each a toothpick for easy dipping)
  • Honey Mustard Pretzals
  • Trail Mix (peanuts and M&Ms for Hannah.  Peanuts, raisins, and M&Ms for Laura)
  • Heart and Star shaped cheese.  (Colby Jack and Pepper Jack cheeses)
  • Red Grapes (frozen)
  • Fortune Cookies (1 each)
  • Frozen Juice Boxes (100% juice)

Lessons from last week: the frozen mixed fruit (grapes, strawberries, and pineapple) did not work so well.  As the fruit defrosted, the juice from the berries and pineapple mixed and made it taste strange.  This week I am freezing a single fruit: grapes.  
We still have temps in the 100's here, so I like to include a frozen water bottle, frozen fruit, and (this week) a frozen juice box.  This should keep the entire lunch at an acceptable temperature until lunch time.

Meatballs:

1+ lb of lean ground beef (15%)
2/3 c. Panko (except I forgot to buy this, so I used crushed Saltines)
1 egg
1 T. Lawrey's Seasoning Salt
1 t. ground pepper

Combine ingredients then shape into meatballs.  I used a scant tablespoon of the mixture to create each "mini" meatball.  Bake for about 10 minutes at 375 F degrees on a cookie sheet sprayed with non-stick cooking spray.  


Sunday, August 12, 2012

Making a Week of Lunches (when it is hotter than it should ever be..)

This year, I am trying to improve the quality of my girls' school lunches.  They aren't picky eaters, but last year I gave them a sandwich, crackers, and a cookie.  Every. Day.  I am looking to make the lunches healthier and more interesting this year.
First, I needed to shop.  I purchased:


  • watermelon
  • pineapple (fresh)
  • green grapes
  • strawberries
  • pretzals 
  • Go-Gurt Naturals
I already had tortillas, turkey pastrami, and hummus at home.  It has been over 100 F degrees in our area for over a week now and I am concerned about the girls' lunches staying cool and fresh.  I also want them to be hydrated during a long school day.

I washed my watermelon and cut it into quarters.  I slide my knife between the flesh and rind on each corner and make a long cut.  When the cuts all connect, I use my knife to pry the watermelon off of the rind in one large quarter section.  I sliced each quarter into 1/2 inch thick slices and then used a small, heart-shaped cookie cutter to make cute shapes.  Each Zippy bag got 4 watermelon "hearts" and then went into the frig.
I twisted the top of my pineapple off and then skinned it and cut it into quarters.  I used my knife to cut the pointy edge off of each quarter, from top to bottom (the core).  Then I sliced the pineapple into bite sized pieces.  I washed the grapes and plucked them from the stems.  The strawberries were washed, hulled, and quartered.  These three fruits were placed together in a Zippy bag (5 grapes, 3 pieces of pineapple, and one quartered strawberry) and then frozen.  They will help keep the lunch cool and the fruit should still be cold when eaten at lunch time.  I don't think the watermelon would freeze well, so I left that in the refrigerator.
To make the Turkey Pastrami Roll Ups, I spread a tortilla with hummus, laid down 3 small slices of pastrami, and added a little mustard, then rolled it up tightly and cut each one in half.  Each baggy got 1/2 of a roll up.  My daughter, Hannah, doesn't care for hummus on her rolls ups, so I just put mustard and pastrami on hers and then she added a tiny star sticker to each baggy that doesn't have hummus.  When I pack the lunches in the morning, those stickers will come in handy.
The pretzals were easy.  I just put a handful into a baggy and then put them away in the cupboard.
I put the box of Go-Gurts in the freezer and they are ready to be packed into lunches.

Each girl will have a frozen water bottle, a frozen Go-Gurt, a frozen bag of mixed fruit, a Turkey Pastrami roll up, heart shaped watermelon pieces, and a bag of pretzals.  

Hannah said to me, "Mommy, that watermelon reminds me of love because you cut it into hearts."  That is exactly how I hoped she would feel.